Tuesday, December 29, 2009

Vulture's Knob Cross series...a vintage ride too!

Just in time to help burn off those holiday cookies, the schedule for the winter cross series at Vulture's Knob has been posted. If you are interested in playing in the cold and sliding in the snow and mud with a multitude of brightly colored friends, here's your opportunity.

All races tend to be pretty low key and focus on FUN. Here's the skinny;

Gather at the garage around the warm fire for the start of the "Wish you'd stay'd in bed" cross series each Sunday at 1300 hours for the start;

January 3
January 17
January 31
February 14
February 28

The course has changed for 2010, but will still be 1 mile around with well signed corners. No special equipment is necessary, as folks show up on all manifestations of bikes. We won't discriminate if you want to huck around on your 3o's Excelsior or your $5000.00 carpet fiber super cross machine, it's all good. Come on out and play a bit :)

Kalten and I got out for a couple hours to check out the course on the vintage rides; we had fast conditions albeit cold and windy. As evidenced by the photos below, we just beat the onslaught of the latest snow storm...whew!

Before the ride...
Just after ;)
I always make an effort to jump back on the old 80's bike a couple of times a year to remind myself just how far bicycle fit, comfort, and performance have come. I still love my old ride, just really appreciate my new one as well ;)

Back with shop news tonight.

cheers,

rody

Monday, December 28, 2009

Groovy customers play Santa...

I know that I have been blessed by the people that I work with through frame building when opportunities like this come to fruition.

There is a great kid here in town who's family is not as fortunate as others in their ability to prioritize the family budget to allow for such expensive items as a mountain bike for a burgeoning young racer. Battling it out on a donated Trek 3000 bike last season (a low end recreational model that was well used when he received it), this young man really embraced the spirit of what cycling in the woods is all about; adventure, new discovery, and expressing the richness gained from the experience with a smile. Although he never complained once when inevitably another inexpensive part would break, we wanted to do something for him to allow a more reliable race season for 2010.

Although behind the scenes and not publicized, many of you folks stepped up and donated parts, money, and time to make this a reality.

So I want to thank you all for your generosity and for the gift you've given me...affirmation that even in tough times, the folks that I have the opportunity to work with here at Groovy are the ones that I'm proud to call friends.
You're good folks!

sorry for the crappy cell pic, I'll get a new camera soon, I promise :)

cheers,

rody

Friday, December 25, 2009

Merry Christmas All

May your day be filled with family, sharing, and joy...

rody and family

Sunday, December 20, 2009

Saturday and Sunday I worked on Ti bars, trying to get them out to folks before the guy in the big red suit shows up.

Titanium takes longer to work with, as the material demands a meticulous process, insuring cleanliness and precision. As I do bars in batches, one step that I take to insure that the tubing is ready when I am is to bag all my parts after they've been cleaned and prepped with Scotchbright, limiting atmospheric contamination and dust niblets that float around.

Once out of the bag, they get another quick rub with the Scotchbright to knock off any oxidation, an acetone bath, then purged and tacked up. Here's a bar getting it's final purge before welding. How long do I purge for? I try to allow for the calculated interior space to be replaced with argon by a factor of three...about 5 minutes per bar at 6cfm does it for me. Once filled, I knock the flow back to a maintenance rate to keep up with leakage out the miters.
Each bar takes me about 35 minutes for welding, alignment and inspection once all the dead time is factored in. Mid afternoon Sunday and here's what I've gotten done today... 10 more bars to go before tomorrow morning :)

Gonna have to run to Canton in the morning to pick up some new ceramic nozzles for the blast cabinet then I'll get these glass beaded, rubbed out, and off to their new homes.
cheers,
rody

Friday, December 18, 2009

Tales from behind the helmet...

...the welding helmet, that is.

Worked on welding up the rest of the steel bars for this month, so it was a repetitious day crouched over the weld table. Honestly, with the hectic emotional stuff going on the last week, it was nice to be in that quiet, focused place.

One thing that amazes me when doing a lot of welding is how the filler wire just seems to disappear; when I pull out a new piece of filler, it gleams of promise and excitement with it's 36" length. Soon, before you know it, there's just a stub in between your fingers...
I really enjoy the different processes for joining metal and the variety they offer. As an example, when fillet brazing, the whole joint needs to be brought up to temperature to allow for good penetration and even tapering of the edges of the puddle into the base material. A lot of heat radiates from the work, creating a "hot potato", hoping you don't accidentally sacrifice some skin to the piece if touched. In this example, the heat of the Tig puddle is so focused and small, I can have my dainty fingers a mere centimeter away with no acute result...a good layer of thick callous helps :)

So, here's what I got done in the morning hours...the last bar is built inside the stem for Martin, who was excited to win it and disappointed that his Luv would not pass through the traditional split front. Kinda like a one piece bar stem combo, but at least this one can rotate ;)
The pups have not been getting out of the house much since the weather has turned cold, so I brought them to the shop with me today. Frankie was a good buddy, sleeping soundly beneath the weld table most the day.
Off to go do some powder, pics of Steve's rear end (the bike, not his) later this weekend.
cheers,
rody

Been electronically absent...

Not been around the computer the last week...had two deaths in our FD family in the 9 days, so much time spent assisting with arrangements, participation and the uncommon work of life.

Hold your loved ones close and cherish them as we move toward the holidays.

Be back with some shop news tonight.

rody

Thursday, December 10, 2009

Can you feel the Luv?

Ok, it's official...winter is here. How can I be so sure?

I offer to you visual proof...the wooly green socks have been shod. Alas, it has become sock and sandal weather :(
Today was one of those days that test one's determination to do this for a living...6 degrees outside means chilly willy in the shop, sunless and dark when I arrived and moonlit when I left, and long repetitive work all by yourself. Way better than working for "the man" any day though ;) ... darn tooting!

I spent the whole day prepping for the December bar run; cutting steel tubing, parting off Ti material, turning down and squaring off in the lathe, deburring all the edges, sanding each piece, and then washing it all in a mild degreaser for weld prep. I should have 45 bars done by Sunday night, when I'll be able to turn my attention back to frame progress again.

The only visitor I had today was this little guy...
A hairy titanium little pile of fluff that kinda reminded me of the cuddly yet problematic Tribbles from Star Trek...
Y'all see the resemblance?

After all the prep work for the bars was done, I turned my attention to some resto work, and stripped an old Yo for some Grello paint. So there ya go, a full days toil reduced down to a few boxes of parts and some tubes on a granite table...
don't look like much now, but hopefully it'll translate into lots of smiles in a week or so.

cheers,

rody

Wednesday, December 9, 2009

Cleaning up...

Sorry for the lack of posts of late...I kinda feel weird putting up posts without pics. As my camera was unwillingly redistributed to a new owner, I've obviously not been shooting a lot.

I had three final items to fix up post break in. The last was today, Jim's Fox fork repaint. It was sitting happily on the table waiting for Jim's return from his Thanksgiving snowboarding trip when it and two other finished items were showered with rock and glass. The chip and scratches from getting knocked to the floor were beyond my feeling good about just touching it up, so round two commenced. The entire fork was sanded back down to primer and resprayed. I normally take everything apart, paint, then re-assemble, but I really hated to put the seals through that again so masked it up and sprayed it intact...we'll see how it turns out.

Jim is craving to the need for more speed than his fully rigid set up allows so he can out shine his riding buddies (watch out now, Vince!). Hopefully, it'll look good going that fast.
In between clear coats, I began working on the last run of Luvs for the year, I'll post up some pics tomorrow night for y'all.

cheers,

rody

Wednesday, December 2, 2009

Back to normal...

After a couple of days lost to fixing the shop back up and taking care of some office work, I moved back into a semblance of normalcy today.

I've been dragging on Steven's frame a bit as I've been waiting on a set of Hot Rods from Pa. Without them in hand, I made a phone call and got the skinny on all the specs today so I could continue to move forward with the rear end...really did not want to build it up and find out I have interference with the chain line for the triple after the fact.

So, armed with the appropriate numbers (thanks Big Willy), I soldiered on. I completed the finish work on the custom '30s dropouts, milling off the CNC tabs, chamfering the edges, and tapping in the derailleur hanger. They look spiffy and should flow nicely into the scalloped stays. Having already fabbed up the seat stays in a compound rolled/lateral bend configuration, I moved onto the chain stays. I wanted to keep with the old school spirit, but the frame we were using for inspiration was kinda bland in this particular area, simply running a straight constant diameter tube back from a socket in the bottom bracket. Kinda cheesy.

So, taking a cue from some other Klunker designs, I bent up some material with a nice tire clearance bend at the bottom bracket and then an upsweep bend 90 degrees around the tube to flow it up to the dropout. The .035 chainstays stretched cleanly with a little inside support and have a nice round finished shape. Should be purty.

Room for the tire here...
and a gentle rise up for greater drive train /stay clearance and a bit of pizazz.
Granted, they don't look like much now, but they should be functional and a bit sexy once melted into the rest of the frame :)

I also received an early shop Christmas present today...a new Graphtec plotter.
This guy will expand my ability to create complex computer generated paint masks and make multi layer masking more efficient as well as increasing the quality of the final product. Now if I can quickly learn the latest version of Illustrator and the new cut software plug in...should make for some nice "as I doze off to sleep" reading in bed ;)

Next day back, we'll put the rear end on Steven's bike, hang all the fiddley bits, and get her ready for paint.

cheers,

rody

PS... Last years Black Friday sale I had one bar that was shipped to England for a German customer who was visiting his parents. The bar never made it and it's replacement has been patiently sitting here on the shelf. Problem is, I can't remember who the customer was???? If this story sounds intimately familiar, please email me so I can make it right by ya. thanks!

Monday, November 30, 2009

People suck...well ok, maybe only a few

Hope everyone's holiday weekend was grand.

I worked a 60 hour shift Thursday through Sunday morning at the FD so I missed out on the big family feast, the shopping madness on Friday, and enjoying a long weekend.

Highlight though was 0230 call from the Wooster Police Department Sunday morning.... "Hey Rody, there's been a break in at your shop, we need you to come down for a damage and inventory assessment."


"_________ !" ... I'll let you fill in the blank with the expletive of your choice. I won't share mine, as I'm pretty sure it's not meant for family reading consumption.

As I pulled into the parking area, there were five police cruisers all with their spot lights on, aimed at the north window. I quickly scanned the back seats of the cars, hoping that one would be filled with my uninvited guests; no such luck.

I could tell from the exterior that the damage was bad, glass everywhere, stuff turned over inside, and police officers dusting for prints near the window. I paused for a moment and took a breath as a weird queasy feeling twisted in my stomach...gosh I hate that.

As I came through the door, most of the officers were gathered around one of the mills. Announcing my presence with a bit of a grunt, they quickly turned around and smiled, like kids getting caught looking through their dad's dirty magazine collection... "Rody, this stuff is so cool, do you think you could make a couple silencers with all this equipment?" Glad their minds were on the task at hand ;)

The burgler's had let themselves in using a large sandstone block lobbed through the triple pane glass and then crawled through the window over the weld table. I had hoped for some blood stained glass around the entry point...not so much for DNA analysis or anything fancy like you see on CSI, but for a bit of cruel kharmic revenge. Alas, let down again.

Fortunately, after surveying the shop through a hazy early morning mindset, my losses appeared to be minimal. I believe their intent was to access the store in the front half of the building, breaking through a wall in my assembly area to gain access to the Glass Bongs, Rap music, and crystal studded gangster clothing that is sold there. No accounting for taste I suppose.
So, Sunday and today were spent doing inventory, cleaning up, replacing the window, closing the hole in the wall, and fabbing up some nice steel window bars to provide a deterrent against future midnight visitors.
Framebuilding as a career would be so cool if all you had to do was make peoples cycling dreams come true. Too bad all the business stuff goes along with it :)
cheers,
rody


Thursday, November 26, 2009

Wednesday...holiday packages going out

Yesterday was a flurry of activity as Christi and I got bars, forks, and soft goods wrapped, packaged and out the door. All the steel bars for December should be on the way with Ti scheduled for the next two weeks.

Michael was able to stop by and pick up his chamellion metallica BOI fork, hope he chooses to share some build pics with all of us this winter.

One of the fun bars to head overseas to Daniel was this Dino themed piece. Dan had seen the funky pink and green splatter alligator bar I had done and wanted something different for his old vintage ride in a silver color. We agreed that some dinos would rock it out...

I got a little carried away, adding in some airbrushed brown turf, blue skys, and some hand painted plants and clouds, but it really seemed to be appropriate.

Anyhoo, hope you like it Dan.

Back in the FD today for Thanksgiving...hope you all are enjoying the day with your families.

cheers,

rody

Monday, November 23, 2009

Web crawling tunes...

Need some funky tunes to surf the web to tonight while you are checking out your favorite forums/blogs/whatnots?

Check out some offerings of Funk, Soul, and Hip Hop from our brothers to the north...

WeFunk radio

Get your groove on baby!

r

Weekend round up...

Last post we left a few forks looking kinda pale in their primer'd skin, today I'll how ya how they turned out :)

Dario from Italy commissioned a BOI fork for his Yo to match the Kooka nightstorm color scheme... a mix of black to 3D Violet with turquoise splatter. I had to custom mix the translucent purple, spraying it over a sterling silver base and it came out really nice (of course you'd never know it in pictures...arghh!) I can't wait to see this built up with the rest of the bike.


Michael, probably better known as IF52 to all you VRC guys, was to stop in Saturday evening to pick up his fork, but I had to scadaddle due to a family medical happening. So, to soothe his soul til we can meet up, here's a pic of his BOI fork to go on his Chameleon Metallica Yo.

And finally, I'd like to introduce you to the weekends headliner, held by Christi ...
My sister was due to have this little girl toward the middle of December, but she decided to come early. Of emergent concern was that she presented breach, so a C-section had to be performed expediently to help her out. We rounded up the family and traveled down to Columbus to OSU Medical Center to meet her. Congrats to Lacy and Tim on the birth of my new niece :)

cheers,
rody

Saturday, November 21, 2009

slow week...

Sorry for the lack of action folks, had a slow week in the shop due to lots of hours at the fire department and teaching...when I finally crossed the threshold Friday I was pretty mentally sluggish, just could not keep focused. That being the case, I did not get a lot accomplished.

I spent most of Friday installing the new DRO (digital read out) on the Lagun. This piece, while not a necessity, will certainly speed up operations for fixture work. It is made up of two precision measuring scales that must be mounted to the fixed and moving axis's of the machine to provide numerical feedback on tool location. I had to fabricate quite a few parts to get the scales mounted just right. She works a charm...

I also installed a new Kurt vise and speed handle. Gotta admit, the vice is spendy, but the handle is a steal! Custom machined out of solid steel billet, three removable handles, all nicely treated with black oxide here in the US for the bargain price of...ready for this? 22 bucks, dang! If any of you fabricators out there want the contact info, drop me an email.

The kids stopped by to have dinner with me one night, a sumptuous meal of roast beef sandwiches. We sure now how to live (read with HEAVY sarcasm).

This morning I began some paint work on two forks...one for Miguel and one for Dario. A little primer and flash off in the box...
Miguels is going to be bright yellow with black/silver Eddy's on the tops, and Darios is gonna be a whole lot different... black to 3D Violet fade with Aqua splatter. All to match his Kooka components of the same ilk. Should be sick.
While I had paint flashing off, I sat down with Kalten to teach him to build wheels. Every 14 year old boy should know how, right?
He's lacing up a set of commuter single speed wheels for a beat Yo that will be his new school bike as the 64 Schwinn Phantom has finally been deemed too small to continue service. We had a nice chat, puzzled out some wrong lacing, and had to end out session early as a family medical emergency occurred.

best wishes,

rody

Monday, November 16, 2009

Tri-plane fork...working in some kinks

So I take one day off out of the shop in three weeks to take some stuff to Pa and ride with some friends and as soon as I hit the parking lot...

"Why aren't you working on my frame?"

Who'd thunk, but Stevie D. just happened to be at the same trail head to ride the same trail at the same time as me...even though neither of us live anywhere close by. Surprised the crap out of me. Such is the cruel irony of building for others, the burden of keeping projects moving never leaves you. Fortunately, I bonked to the point of near hysterics, so that over whelmed any guilt I was feeling :)

So, the last two days I've been working in the shop to keep Steven's highly custom frame moving forward. A number of fixtures needed to be made to bring the fork crown fabrication into reality; an indexed flat crown bender, a mitering fixture to locate a origin point hole for the second operation bends, and a fixture to hold the bent crown for final milling of the 1.00" fork leg opening. All those special pieces take a bunch of time but will allow for excellent repeatability and efficiency if I choose to make more of these.

A shot of the bender. The center 1.125 steerer hole locates over the top of the circle and is clamped down by the square stock sitting on the vise, allowing for the bend to be placed equally on both sides of the crown.
The crown is then taken out, the bender reset for the leg portion, and then each side is bent again. Here's a shot of the final leg bend being placed, you can see the almost complete crown just below the bending arm...
The first mocked up piece...the angles are a bit steeper than what I want. I'll run another and then scribe a point on the bender or add a stop screw to indicate the appropriate distance for each bend.
A quick mock up on the steerer. I played with 4 or 5 spacing sequences and am still not decided on where I want it to be. This shot is a tighter configuration than the original drawing.
Despite my best effort, these projects always take longer than anticipated. I'm sure that it will be worth the effort though when the finished bike hits the dirt.

cheers,

rody

Wednesday, November 11, 2009

Detroit bound today

Hey y'all, quick post cause I'm bushed...

Drove up to Detroit today with Mike S to pick up the Lagun FTV-2 from Tartan American Machinery. I headed up with a bit of trepidation, as I had tried a couple of times to get the pick up date scheduled and was advised the mill was not yet ready to go.

Those worries fell away when I arrived; Tim (pictured below) is the go to guy at Tartan for machinery repair and prep. Tim had lovingly worked on rebuilding this machine for the last year from the ground up, insuring that each part was as perfect as it could be. His desire to send out the mill in A-1 shape was responsible for the delay and his goal was realized...Tim, you did a bang up job! I'll proudly take care of her for years to come.

I've gotta give major props to the folks at Tartan, from the excellent communication that Chris provided to the preparation prior to delivery by Tim, each step was handled in a professional, friendly manner. You could not do better than to work with this fine group...check them out if you need some new toys in the shop... click here

Gonna move some machines around in the am to fit the Lagun in and will be working on catching up on email in the afternoon between paint work. Thanks for everyones patience.

rody

Monday, November 9, 2009

Not feeling on my game today. Probably a combination of... uhh, who knows what, just didn't have it.

I worked through the vintage dropouts and fork crowns today, checking the spec and getting them ready to use on Steven's build. I'm pleased with how they came out. I need to do some final machine work on them; breaking the edges, tapping the M10 derailleur threads, cutting off the material anchor holes.

With the dropouts in hand, I set to working on developing a system for bending the stays for the project. I knew this was gonna be a bugger to get right, here's why. Most Klunker style seat stays were one of two types; either they were long stays that ran from the dropout all the way to the headtube with just a single bend to meet the seat tube, or they arched up to meet a segmented joint at the seat tube. Modern adaptations have used "tee" joints to meet the seat tube or a monostay and "tee" joint to fit the rear end together. Steven wants something that looks fluid, so I played around with some options. In the end, I decided the most aesthetic and functional design would be to use a single stay with a compound bend...rolled for the constant radius into a single lateral bend to meet the seat tube. While this will look the best and offer the strongest joint, it is also very difficult to achieve.

I spent the afternoon experimenting, working on a process to get both the lateral bend and the rolled radius without crimping any of the bends. I finally hit on a process that worked well and am moderately happy with the first stays. I'm gonna fine tune the dies a bit more and then make Steven's pair.

Here's a couple shots from today...

Making a new bending die to fit the 1.25 pivot post...
A top view of the seat stays with the lateral bend...these will yield 3 inches of rear tire space.
A side view of the mock stays in the fixture. I had to really arc these more than I had planned due to the short span from the dropout to the seat tube for a visual radius to be present. This is the bend I want to fine tune a bit before I make the final pieces.
I'm looking forward to doing up the plate fork crowns, I think they will compliment the style of the dropouts and really bring the bike together in a balanced look.

cheers,

rody

Sunday, November 8, 2009

Friday's Hot...in the shop and on the job

Hey y'all,

As I finished up email Thursday night, I glanced at the clock with drooping eyelids... "0100 hours, gonna be a short night".

Seems like the alarm went off at 0430 as soon as I closed my eyes, but I needed to get a couple of hours in at the shop before heading to the fire department for a shift. I'm actually pretty productive in the early hours; the phone doesn't ring, no one stops by, and there's nothing to see out the window so daydreaming is kept to a minimum :)

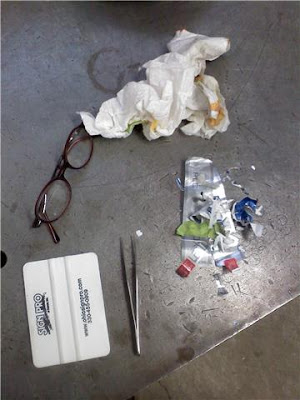
I started stripping off the decals on Jim's Fox fork that is to be painted in a Jolly Rancher scheme to match his Bigwheel. Who'd thunk it would take over an hour to pull off some decals and their residual stickiness. Let me tell you, if you are getting an new 2010 Fox product, the decals are gonna stick in there for the life of the product ;)

An X-acto knife, weeding tweezers, and a lot of Goo-be-gone and elbow grease finally left me with a pile of scraps...
With the decals all gone, a quick mechanical breakdown, solvent wash and some 600 grit paper will get these babies ready to head to the booth. Yep, that's right, I do not strip off the powder on the forks before painting. Here's the reason why. The magnesium legs that are common castings on fork lowers have a physical property of "off gassing", where the material constantly emits a gas. To paint these, you need to use a specially formulated primer that creates a vapor proof barrier. If you do not, a liquid paint job will develop a bubbled type of appearance rather than laying smooth. Powder coats will tend to have a shadowing effect, being darker in some areas than others. As Fox already has a non-permeable base down, I'll simply mechanically and chemically prep and build off of it. The tolerances are such that I can keep the layers thin to avoid any post paint interference.
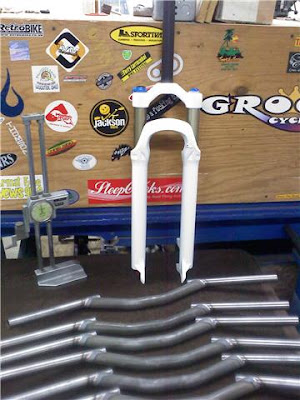
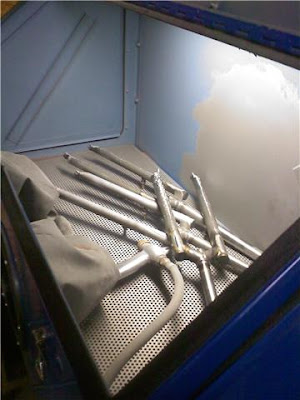
Once I got Jim's fork on the way, I started to blast a few rigid forks to be sprayed up this week...Dario, Michael, and Miguel, these three are yours and the last that I am doing until I can get the build list caught up.
Satisfied with some work completed to set me up for next week, off to the FD I went, arriving at 0630. I had just met with the other shift commander and began to accept the command for the day when the alarm sounded for a garage fire. We stopped, looked at each other, and both decided to go. The benefit for me is that my typical position requires me to organize the fire scene from the exterior at the command vehicle. With another Command officer on scene, I got to revert to my true love, playing inside the fire.

There is no high attainable that can compare to an interior attack on a structure fire. The feeling of crawling into a dark structure full of adrenaline, incredible heat pushing you to the floor, every instinct in your body telling you this is wrong, but pushing forward regardless. Soon the very air around you is dancing with tendrils of light and flame, rolling over your head as it crosses the ceiling and licking ever closer to you, eagerly consuming every material in the room. It's then that you are in the zone. It's almost magical to watch, intoxicating with the flood of endorphins, and seems a shame to open the nozzle until reality hits you in the face and you realize, Damn, it's fucking hot in here! Within seconds of adding water to the mix, the room falls pitch black, the heat changes to a severe suppressive force, full of moisture and steam, and your focus changes to quickly getting some ventilation to reduce the temp and pressure... too cool.

I was fortunate enough to play at the garage fire which flashed on us, but then luck was on my side when less than a minute after going available, we were sent to a house fire just a few streets over. In the front door with the line to do it all over again, oh yeah!

Here's a shot of the house just after knocking the fire down courtesy of the local paper...me and the rest of my kick ass C shift crew are somewhere on the second floor right now...
You can read the excerpt here if you are so inclined...

www.the-daily-record.com/news/article/4706018

As much fun as it is playing on the inside, the downside is the rest of the work. Salvage and overhaul, investigating, clean up of the equipment and then hours of paperwork. The crew and I finally finished up with everything about 1830 hours, 12 hours after I came in. Breakfast and lunch had passed us by and the day was not yet half over but I was shot. Being a Friday night with warm weather in a college town, the prospects of getting much rest were not looking good.

Needless to say, I was pretty worthless in the shop yesterday. Christi was out of town for the day so I ran kids to ice skating and swim team practices, prepped a few more bars for shipping, then took the afternoon off to run the dogs at the knob and do a bit of street luge with Kalten, Emmy, and our friend Tim Long on Flickenger Hill; a nice long straight run that gets you up to about 30-35mph, a good rate when you are an inch and a half off the ground.

Gonna hit email today and see if I can get some more web page revisions done. Oh, also got two sets of the vintage dropouts completed, so I'll be finishing Steven's project this week, finally!

cheers,

rody

Thursday, November 5, 2009

Big One Inch for sale...

Hey y'all,

Due to a customer's changing circumstances, I have a BOI for sale.

Here's the details...

Fat Chance BOI replica
1.125" threadless steerer
1.00" legs
80 mm suspension corrected axle to crown (430mm actual length)
Canti posts
Metallic silver color

The customer had to sell his Yo due to financial constraints and has asked to pass on the fork, so this guy is up for grabs. This fork would be suitable for a 97-99 era Yo.
Cost is 315.00 plus shipping.
Drop me an email if you are interested.
cheers,
rody

November contest answer...oooh look!

Guys and gals, I really enjoyed reading your responses guessing what in the world that little fixture could be for...you really are a sophisticated group :)

Alas, Sean of Vertigo Cycles, www.vertigocycles.com , shared the correct answer, although I think he may have had some inside experience ;)

Welding titanium is a finicky process that requires a couple things;

1.) a totally anal retentive approach to material prep and cleanliness
2.) an oxygen free environment until the material cools below 800 degrees F
3.) a methodical welding process to protect against the materials desire to pull and move
4.) patience

The fixture helps me with #2. As you can see in the pic below, a titanium grip section with a breather hole 1.0" from the end is inserted into the tight tolerance section of the fixture. The end is then plugged with the argon feed and argon will then fill the larger chamber through the breather hole. The slotted window allows me to drop in an end cap, push the grip section up tight, then weld it in place while bathed in an oxygen free environment. The flat stock orients the fixture on my roller so that I can still spin the grip section for fusing the end cap...silly fun!

When there is contamination...either oxygen, dirt, or otherwise, you will get a very pretty rainbow of purple and blue color; pretty now, doomed for failure later. You want a totally shiny finish when you are done. Here's the first piece out of the fixture...

Overall, I'm really please with how it came out.
Now, there were lots of super answers, but only one correct one. As Sean already has a shirt and stickers, I'm going to honor his request and pass on the bounty to Grumpy as he was first in with a more descriptive answer (Roy, you were in ballpark, but honesty, don't you teach kids? What kinda run on sentence was that? ...read with heavy sarcasm). So Grumpyone, email me and we'll get some stuff out to ya.
As a round up for the last two days...I powdered all the steel bars and finished fabrication on the Ti's this afternoon. Christi took a car full of packages to the post office and we have about 10 bars that we could not fit in to send tomorrow. So, if y'all are expecting a Luv, it should be coming soon.
cheers,
rody

Wednesday, November 4, 2009

November Contest Madness...

Hey there tech heads...I assume that most of you follow the blog because you enjoy seeing the build process unfold in front of your eyes. Well, as most of you can bear witness, it takes a variety of tools to accomplish the fabrication process of a high end bicycle in an efficient and consistent manner.

Today, I added another piece of tooling that cuts down on my fabrication time and increases the quality of my product. It's something I've needed for a while but just have not taken the time to make; today was the day.

So, let's see how intuitive y'all are. The first one to post a comment that correctly describes the intent of this item and how it works will win a free Groovy Tee and sticker, mailed to your door. Of course, you gotta be a registered reader/follower to play :)

Here we go...

The first pic shows the ingredients for the item, can you visualize what it is to become?

Some quick fabrication time elapsed and we have the finished product...a view from the side
from the top, note the lateral slot and the small nub on the inside end.

Bottoms up... an enclosed end cap and a mitered plate to note in this shot. The other end of the tube is open.
I'll use this little guy every month, so those of you that are familiar with what goes on in the shop will have a head start. Have fun, we'll do the big reveal later tonight :)
Good luck,
rody
PS...Hubby, you don't get to play as you heard about it on the phone last night ;)